Introduction
Autotask provides a complete IT business management solution that combines Service Desk, CRM, Projects, Time & Expense, Billing and more.
OpsRamp configuration
Configuration involves:
- Installing the integration.
- Configuring the integration.
Step 1: Install the integration
To install:
- From All Clients, select a client.
- Go to Setup > Integrations > Integrations.
- From Available Integrations, select Collaboration > Autotask.
- Click Install.
Step 2: Configure the integration
Configure the following: - Inbound - Outbound - Monitoring of Integration - Audit Logs
Inbound
To send entities from Autotask to OpsRamp:
- Authentication: Configure the authentication to call Autotask APIs.
- Select authentication type as Webhooks and click Save.
- Take note of the Tenant Id and Token. These values are used for configuring Webhook in Autotask.

Autotask Integration
- Map Attributes: Map Autotask attributes with OpsRamp entity attributes.
- Select OpsRamp entity from the drop-down menu.
- Click Map against the respective attribute, provide the mapping details and click Save.
- ITSM Properties: Define properties required to call Autotask API using events.
- Provide the values for Account Id, Queue Id, NoteType and then click Save.
Outbound
To send entities from OpsRamp to Autotask:
- Integration Basic Configuration: Configure basic notification details to trigger integration events.
- Notification Type: SOAP API
- Base URI:
https://{subdomain}.autotask.net/atservices/1.5/atws.asmx - Authentication Type: BASIC
- Provide username, password, and click Save.
- Map Attributes: Map OpsRamp entity attributes with Autotask attributes.
- Click Map against the attribute. Create Integration Mapping window appears.
- Provide the mapping details and click Save.
- Integration Events: An action performed on an entity is defined as an event.
When an event is triggered, notifications are sent to the respective users.
- Click Add. Add Integration Event page appears.
- Provide name for integration event.
- Select Service Desk from drop-down, select entity type and then select the action.
- Select Parent Configuration to assign the configured basic integration details.
- Provide URL and select the web method from the drop-down.
- Provide headers name and value, payload and then click Save.
- To add additional tokens to the payload, click on the token in Place Holders list.
- To parse properties returned in the response with OpsRamp, select OpsRamp property from the drop-down and provide the parsing value.
- A custom field that is already configured as response payload attribute for a given integration is not available for configuration in any other integrations. You need to remove the existing mapping from the integration to make the custom field available to map on response payload of any other integration.
- Verify Integration: Provide sample values to validate if the integration is successful.
- Select an event from the drop-down, provide the Xml payload and then click Verify. A 200-OK success response is generated if the integration is successful.
- Integration Failures: In case of a failure in integration, a message is sent to the respective user.
- Select notification type Email, provide the email address and then click Save.
Integration event payloads
Create Ticket
The following table shows fields and values used to create tickets.
| Parameters | Values |
|---|---|
| Endpoint URL | https://{subdomain}.autotask.net/atservices/1.5/atws.asmx |
| Headers |
|
| Authentication | BASIC |
| Username | Autotask Username |
| Password | Autotask Password |
Sample Request
    <?xml version="1.0" encoding="utf-8"?>
    <soap:Envelope xmlns:soap="http://schemas.xmlsoap.org/soap/envelope/" xmlns:xsi="http://www.w3.org/2001/XMLSchema-instance" xmlns:xsd="http://www.w3.org/2001/XMLSchema">
     <soap:Body>
     <create xmlns="http://autotask.net/ATWS/v1_5/">
     <Entities>
     <Entity xsi:type="Ticket">
     <id>0</id>
     <AccountID xsi:type="xsd:string">11778</AccountID>
     <Priority xsi:type="xsd:string">3</Priority>
     <QueueID xsi:type="xsd:string">29683484</QueueID>
     <Status xsi:type="xsd:string">1</Status>
     <DueDateTime xsi:type="xsd:string">2015-04-29T13:38:35.0000000-04:00</DueDateTime>
     <Title xsi:type="xsd:string">Test ticket please ignore</Title>
     <Description xsi:type="xsd:string">Test description</Description>
     </Entity>
     </Entities>
     </create>
     </soap:Body>
    </soap:Envelope>
Sample Response
    <?xml version="1.0" encoding="utf-8"?>
    <soap:Envelope>
     <soap:Body>
     <createResponse>
     <createResult>
     <ReturnCode>1</ReturnCode>
     <EntityResults>
     <Entity xsi:type="Ticket">
     <id>9696</id>
     <UserDefinedFields>
     <UserDefinedField>
     <Name>Assign to NOC</Name>
     <Value>1</Value>
     <AccountID xsi:type="xsd:int">29123564</AccountID>
     <AllocationCodeID xsi:type="xsd:int">29123405</AllocationCodeID>
     <CreateDate xsi:type="xsd:dateTime">2015-04-24T07:08:51.943</CreateDate>
     <CreatorResourceID xsi:type="xsd:int">29123885</CreatorResourceID>
     <Description xsi:type="xsd:string">Test description</Description>
     <DueDateTime xsi:type="xsd:dateTime">2015-04-29T13:38:35</DueDateTime>
     <LastActivityDate xsi:type="xsd:dateTime">2015-04-24T07:08:51.99</LastActivityDate>
     <Priority xsi:type="xsd:int">3</Priority>
     <QueueID xsi:type="xsd:int">29123939</QueueID>
     <Status xsi:type="xsd:int">1</Status>
     <TicketNumber xsi:type="xsd:string">T20112324.0010</TicketNumber>
     <Title xsi:type="xsd:string">Test ticket please ignore</Title>
     <Resolution xsi:type="xsd:string" />
     <PurchaseOrderNumber xsi:type="xsd:string" />
     <TicketType xsi:type="xsd:int">1</TicketType>
     <ChangeApprovalType xsi:type="xsd:int">1</ChangeApprovalType>
     <ChangeInfoField1 xsi:type="xsd:string" />
     <ChangeInfoField2 xsi:type="xsd:string" />
     <ChangeInfoField3 xsi:type="xsd:string" />
     <ChangeInfoField4 xsi:type="xsd:string" />
     <ChangeInfoField5 xsi:type="xsd:string" />
     </Entity>
     </EntityResults>
     <EntityResultType>ticket</EntityResultType>
     <Errors />
     <EntityReturnInfoResults>
     <EntityReturnInfo>
     <EntityId>9696</EntityId>
     <DatabaseAction>Created</DatabaseAction>
     <DuplicateStatus>
     <Found>false</Found>
     <MatchInfo />
     <Ignored>false</Ignored>
     </DuplicateStatus>
     <Message />
     </EntityReturnInfo>
     </EntityReturnInfoResults>
     </createResult>
     </createResponse>
     </soap:Body>
    </soap:Envelope>
Use tag:
$Body.createResponse.createResult.EntityResults.Entity.TicketNumber to
read the Autotask ticket ID and save it to the external entity ID of the OpsRamp incident.Error Response
    <?xml version="1.0" encoding="utf-8"?>
    <soap:Envelope>
     <soap:Body>
     <createResponse>
     <createResult>
     <ReturnCode>-1</ReturnCode>
     <EntityResults />
     <EntityResultType>ticket</EntityResultType>
     <Errors>
     <ATWSError>
     <Message>Missing Required Field: DueDateTime. ; on record number [1].</Message>
     </ATWSError>
     </Errors>
     <EntityReturnInfoResults />
     </createResult>
     </createResponse>
     </soap:Body>
    </soap:Envelope>
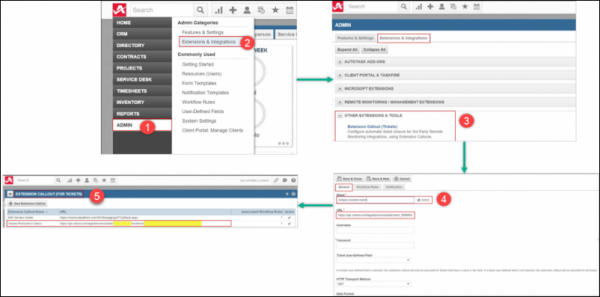
Autotask configuration
Configuration involves setting the OpsRamp incident Webhook URL.
To configure the OpsRamp incident Webhook URL:
- Log into Autotask.
- Go to ADMIN > Admin Categories > Extensions & Integrations.
- From the Extensions & Integrations tab, click OTHER EXTENSIONS & TOOLS.
- Click the General tab and provide the following:
- Name for the callout.
- URL:
https://{api-url}/integrations/autotask/{clientId}/incidents/{token} - Tenant Id and Token: Provided in the OpsRamp configuration.
- HTTP method: GET
- Click Save.

