Introduction
Launching a remote console involves:
- Adding the console.
- Launching the console.
Note
After adding a remote console, access the remote target device through a Java-based console or browser-based console.Prerequisites
The following are prerequisites for launching the remote console:
- Device Manager and Console Manage permissions are enabled.
- Protocol is enabled on the target device. Example: SSH, RDP
- Port numbers are checked for launching the remote console.
- The agent and gateway are active on the target device or on the managed device.
- Login information is available for the target device.
- Target device status is active.
Note
When launching console on a gateway, provide the local host IP address (127.0.0.1).Adding consoles
Add the details of the remote device on which you want to launch a console. You can also edit or delete the configured remote console.
Note
The procedure is the same for adding a Java console or a Browser console.To add a console:
- From All Clients, select a client.
- Go to Infrastructure.
- Click on the category to which the target resource belongs.
- Click on the required resource name.
- From the resource Overview page, click on the settings icon and select Add Console.
- Click +Add to add new set of console details.
Note: You can also edit the existing sample details to add a remote console. The existing sample details are configured for the agent.- If you want to add the gateway as a connector:
- Click +Add. The fields appear in the last row of the table.
- From OpsRamp Agent drop-down options, click OpsRamp Gateway and provide the remote console details.
- If you want to add the gateway as a connector:
- Configure the following details on the consoles window:
- Connector: Refers to the element (Agent or Gateway) managing the target device.
- Protocols: Refers to the protocol that you want to use to communicate with the target device.
- Port: Refers to a port that transmits and receives data. The port numbers vary with Services.
- Username: Refers to the login information of the target device
- Password: Refers to the login information of the target device.
- IP Address: Refers to the IP Address of the target device.
- Name: Refers to the name of the console.
Note: You can add the name in the format RDP IP Address of the target device: Port number. Example:RDP 12.171.1:3389
- Click Save.
The console is added to the consoles list.
Note
You can click Add Consoles again from the settings icon to add more consoles or to remove existing consoles.Launching remote shell consoles
To launch remote shell consoles:
- Go to Infrastructure, click the resource name to add the console.
- Click Launch Remote Console button and select Remote Shell.
Agent Console tuning window opens. - Credentials are validated and Remote Shell console is launched.
Launching telnet consoles
To launch telnet consoles:
- Go to Infrastructure, click the resource name to add the console.
- Click Launch Remote Console button and click Telnet.
You are asked to download a.jnlpfile. - Download
.jnlpfile and then open the file. - From the Console Login page, provide Ticket ID/Alert ID to associate the console activity to a ticket.
- For Activity Log Note, provide comments (required) for Telnet console activity.
- Click OK.
Launching file transfer consoles
To launch file transfer consoles:
- Go to Infrastructure, click the resource name to add the console.
- Click Launch Remote Console button and click File Transfer.
File Transfer console is successfully launched.
Launching simultaneous consoles into multiple devices
Consoles can be launched into multiple devices. For example, Secure Shell or Telnet.
To launch simultaneous consoles:
- Go to Infrastructure, select the resource name to add the console.
- Click Launch Remote Console button.
- Select Management Profile Type - Gateway or Agent.
- Select console Type.
Simultaneous consoles can be launched only by Secure Shell and Telnet. - Provide comments for console activity.
- Select one of the following check boxes:
- Use Credentials: If credentials are available in credentials sets. Simply, select the option from Credentials drop-down option.
- I have Credentials: If you have credentials. User name and password is displayed. Enter the password in the Confirm Password field.
- Manual Login: If you want to manually log into each device after launching the console.
- Click Launch.
View both the Secure Shell consoles.
Launching TeamViewer consoles
Remote consoles can be launched in TeamViewer.
Users having TeamViewer installed can configure OpsRamp to launch TeamViewer remote consoles. The TeamViewer Remote Console feature is intended for environments where full-featured remote desktop support is a key requirement.
Note
Add the console for TeamViewer after installation. Integration is successfully installed only if the console is added.To launch a TeamViewer console:
- Go to Infrastructure.
- Click the resource name to add the console.
- Click Launch Remote Console button.
The Agent Console window appears. Credentials are validated and TeamViewer console is launched.
Launching consoles from different pages in OpsRamp
Besides launching a console from th Infrastructure page, you can also launch consoles from the following areas/pages in OpsRamp.
Launch console from alert details page
To launch console on a resource directly from the alert details page:
- Click All Clients, select a client.
- Go to Alerts.
- Click the required alert ID.
Alert Details page is displayed. - Click the consoles icon.
- Click on the Java console icon or Browser console icon to launch the selected console.
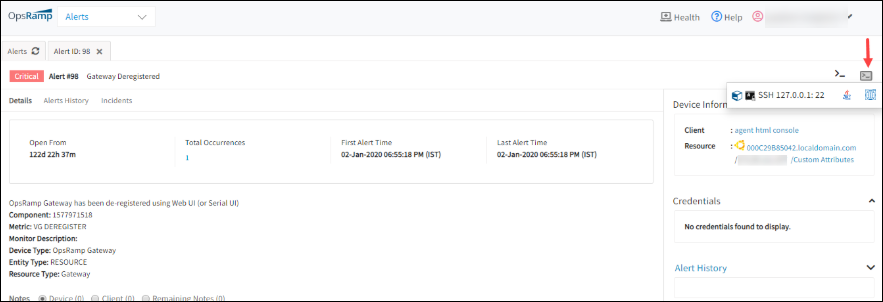
Launch Console from Alert Details Page
Launch console from the Gateway Details page
To launch consoles on devices managed by a Gateway:
- Click All Clients, select a client.
- Go to Setup > Resources > Management Profiles.
- Click on the required management profile name.
- From the Management Gateway Details section, click on the Gateway UUID.
GATEWAY DETAILS page is displayed. - Click the Consoles icon.
- Click on the Java console icon or Browser-based console icon to launch the selected console.
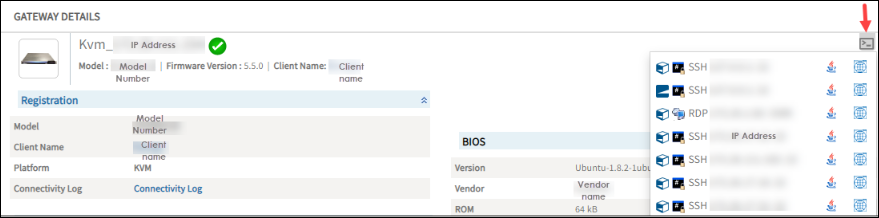
Launch console from Gateway Details page